This tutorial works with the same folder that you downloaded in the first tutorial. If for some reason you do not have this folder click here to download the folder Image_and_Cursor_All in the form of a zip file (248 KB). Then unzip it (this may happen automatically) and place the folder in a convenient place. Your work in this tutorial must take place within this folder.
Begin by opening a new browser window and in the new browser window open the file water_fountain.html. You should see the familiar picture of the water fountain. It may take a few minutes to appear. In the unlikely event that this does not work, open the file water_fountain_alt.html. This module illustrates how Lite Applets can be used together with forms and Javascript to create more interactive Web pages.
As a first step, try the module in the new window. There are various ways that students might solve the problem posed in this module depending on where it is used in the curriculum. For example, this module might be used when students are learning about fitting quadratic functions to data. If you want to see how this module works without doing the work, enter the answers below into the appropriate places in the new Web page and click the Try it!! button. These answers were obtained by marking a series of points along the curve of the water; cutting-and-pasting their coordinates into a spreadsheet; and then fitting a quadratic function to this data.
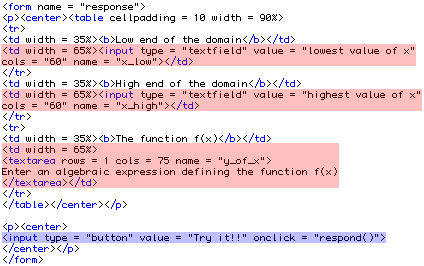
This page combines the Lite Applet Image_and_Cursor with two somewhat advanced features of html -- forms and Javascript. Forms are used to accept input from a user. Javascript is one way that a Web page can respond to the user's input. As usual, with the new page active choose Source from the View menu to look at the html code behind the page at which we are looking. Look for the following block of html code.

The block of code above specifies a form with three places for the user to enter responses. The three blocks of code for these three places are highlighted in red. Another line, highlighted in blue, specifies how the Web page should respond after the user has entered his or her responses and clicked the Try it!! button. In this case the Web page runs a Javascript function called respond().
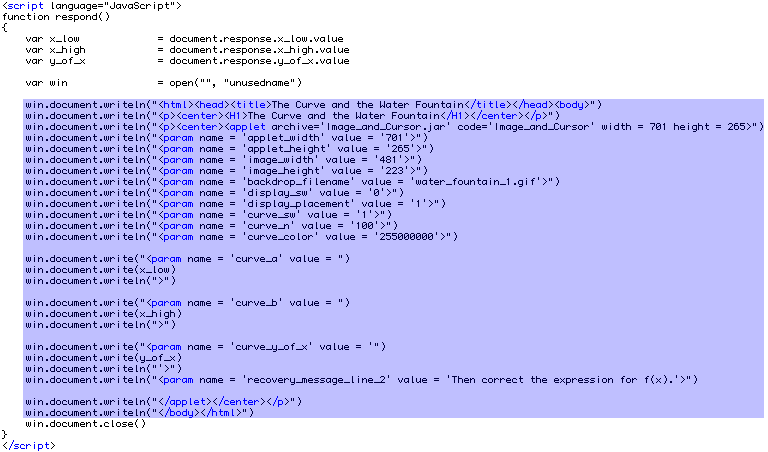
Now look for the following block of code.

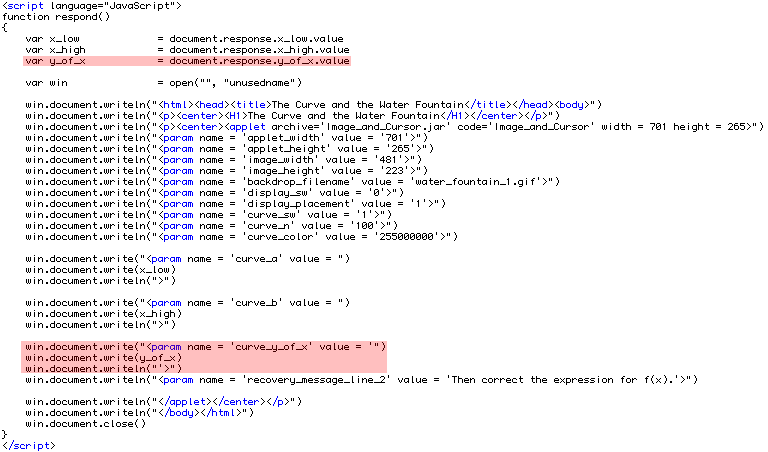
The block of code above is Javascript. It must be placed on the html page in the same place it is placed in this example. For our purposes the key part of this code is the part highlighted in blue. This part generates a new html page after the user has clicked the Try it!! button and incorporating the user's responses in the form. Notice that these lines write very familiar html code. Next look at the lines highlighted in red in the same block of code below.

These lines show how the Javascript function respond() obtains one of the user's responses from the form and uses that response as it generates the new html page.
This is not the place for a lengthy description of forms and Javascript. These are much easier than Java and there is a wealth of books and online resources. You can do a great deal by modifying the code here. To get a feel for modifying this kind of code, you might change the way that the items in the form are labeled or you might delete the items in the form specifying the domain of the function defining the curve and modify the Javascript so it uses the values we used. This would focus students' attention more specifically on finding the curve but, of course, it would lessen the importance of the domain. It is probably not good pedagogy but it is a good forms and Javascript exercise.
This applet is much more powerful and flexible than we have seen in these tutorials. The User's Manual (1.1 MB) describes all of its features.