The Hyperbolic Toolbox
In this document, I describe and examine some software tools that have been developed to aid in constructions in non-Euclidean geometry. The tools consist of Geometer's Sketchpad scripts that automate hyperbolic "straightedge and compass" constructions in each of three models of hyperbolic geometry. These scripts, based on the earlier work of Alexander and Finzer in the Poincaré disk, automate ten "standard" constructions, including constructing hyperbolic lines and circles in the models, and dropping and raising perpendiculars. The tools can be used to enhance student understanding of hyperbolic geometry in several ways, and I give numerous examples of how they can be effectively used in the classroom.
Stephen Szydlik is Associate Professor of Mathematics at University of Wisconsin Oshkosh
Acknowledgements
A grant through the Faculty Development Program at the University of Wisconsin Oshkosh allowed the author to develop the hyperbolic construction tools described in this article. The author greatly appreciates this support. The author also wishes to express his gratitude to the reviewers of this article. Their comments and suggestions have substantially improved the document.
Published December 2001
© 2001 by Stephen Szydlik
The Hyperbolic Toolbox - Abstract
In this document, I describe and examine some software tools that have been developed to aid in constructions in non-Euclidean geometry. The tools consist of Geometer's Sketchpad scripts that automate hyperbolic "straightedge and compass" constructions in each of three models of hyperbolic geometry. These scripts, based on the earlier work of Alexander and Finzer in the Poincaré disk, automate ten "standard" constructions, including constructing hyperbolic lines and circles in the models, and dropping and raising perpendiculars. The tools can be used to enhance student understanding of hyperbolic geometry in several ways, and I give numerous examples of how they can be effectively used in the classroom.
Stephen Szydlik is Associate Professor of Mathematics at University of Wisconsin Oshkosh
Acknowledgements
A grant through the Faculty Development Program at the University of Wisconsin Oshkosh allowed the author to develop the hyperbolic construction tools described in this article. The author greatly appreciates this support. The author also wishes to express his gratitude to the reviewers of this article. Their comments and suggestions have substantially improved the document.
Published December 2001
© 2001 by Stephen Szydlik
The Hyperbolic Toolbox - Introduction: Models for Non-Euclidean Geometry
In The Proof, NOVA's program about the proof of Fermat's last theorem, Andrew Wiles speaks of his experience of doing mathematics:
"Perhaps I could best describe [it] in terms of entering a dark mansion. One goes into the first room, and it's dark, completely dark. One stumbles around bumping into the furniture, and gradually, you learn where each piece of furniture is, and finally, after six months or so, you find the light switch. You turn it on, and suddenly, it's all illuminated. You can see exactly where you were."
Though we as mathematicians with some research experience might recognize Wiles' description of mathematics, as teachers of the subject, it is easy to forget that our students have similar experiences with mathematics that is familiar to us. In particular, college students taking a first course in non-Euclidean geometry are entering a "dark mansion" in many ways. For most of them, the term "geometry" is synonymous with "Euclidean geometry"; a world in which Euclid's fifth postulate does not hold is counterintuitive, confusing, and perhaps even ridiculous to contemplate.
Euclid's Five Postulates
|
The confusion of students is understandable, particularly when one considers the historical development of hyperbolic geometry. From the time Euclid's Elements was published around 300 BC until the beginning of the 18th century, mathematicians attempted to prove Euclid's fifth postulate from his first four axioms. The idea that a consistent geometry could be developed from his first four axioms and the negation of the so-called "parallel postulate" was not even considered as a possibility. Although some mathematicians (e.g. Lambert, Saccheri) unknowingly discovered theorems in hyperbolic geometry in the 18th century, it was not until 1829 that Lobachevsky published the first paper on non-Euclidean geometry. The pioneers of non-Euclidean geometry (including Gauss and Janos Bolyai, who are generally given credit with Lobachevsky for its discovery) had an axiomatic approach to the subject: they assumed the negation of the parallel postulate, and subsequently established results that must follow as a logical consequence (e.g. the angle sum in a triangle in hyperbolic geometry is less than 180 degrees). In some sense, they were "stumbling around" in the dark mansion of hyperbolic geometry while they learned about its structure.
The work of these mathematical pioneers was particularly impressive, for they had no examples of a non-Euclidean geometry to help them visualize their results; they were purely abstract. Though there were no inherent contradictions in this new geometry, neither was there any evidence that this geometry possessed any relationship to reality. Only later in the 19th century following the work of Beltrami, Klein, and Poincaré were there models of hyperbolic geometry available in which the theorems of the subject could be visualized. One might say that the models provide a "lightswitch," illuminating that dark mansion of hyperbolic geometry.
As teachers of geometry, we are called to help our students find their way in the dark mansion. Just as it did for the pioneers of the subject, hyperbolic geometry proves to be a challenge for our students who have no experience with a non-Euclidean geometry. However, the NCTM's Principles and Standards for School Mathematics (p.18) tells us,
"Teaching mathematics well involves creating, enriching, maintaining, and adapting instruction to move toward mathematical goals, capture and sustain interest, and engage students in building mathematical understanding."
It is the objective of this document to describe some tools and related activities that may help students develop their understanding of hyperbolic geometry. These tools employ the Geometer's Sketchpad software, allowing the user to perform standard straightedge and compass constructions in three of the standard models of hyperbolic geometry: the Beltrami-Klein disk, the Poincaré disk, and the Poincaré half-plane. To be specific, the tools are "scripts" in Geometer's Sketchpad, or macros that automate ten "standard" straightedge and compass constructions in each of the models. These constructions include, among others, constructing hyperbolic lines and circles, dropping and raising perpendiculars, and constructing midpoints. A more complete description of the tools themselves can be found in the What's in the Toolbox? section (Page 6).
The purpose of the tools is to provide occasions for students to become actively engaged with hyperbolic geometry. Though the tools may be used by the instructor to develop applications for classroom demonstrations, their real power is that they can be used as building blocks for students to investigate the subject interactively, through constructions in the models. In this way, the tools can be used to foster an active classroom environment, giving students an opportunity to find the lightswitch themselves.
To get a fundamental sense of the nature of the Sketchpad tools, consider the problem of constructing a rectangle in hyperbolic space:
The purpose of the rectangle construction exercise is to help students visualize and understand a fundamental concept in hyperbolic geometry. This construction using the Poincaré half-plane makes a counterintuitive result transparent. More importantly, the hyperbolic construction tools allow students to find the result themselves. While the example above is necessarily shown as a demonstration, a much more pedagogically powerful exercise is to have the students use the tools themselves, in their model of choice. In this way, rather than being passive receivers of knowledge, students become active participants in the learning process. More examples of ways in the tools can be used in the classroom can be found in the Teaching Examples section (Page 8).
The Hyperbolic Toolbox - Selling the Tools: A Pedagogical Argument
At the University of Wisconsin Oshkosh, the mathematics department teaches two half-semester courses in geometry, one in Euclidean geometry and one in hyperbolic geometry. Together, these courses make up a four-credit sequence, designed for prospective secondary teachers who are in their junior year of college. The sequence has both content and pedagogical goals, including the development of
- access to the major ideas of hyperbolic geometry,
- an enriched understanding of Euclidean geometry,
- a deeper conceptualization of the nature of proof and axiom systems,
- exposure to a practice of teaching consistent with the NCTM's vision of mathematics education.
It is with the above goals in mind that the hyperbolic toolbox has been completed. The models considered -- the Beltrami-Klein disk, the Poincaré disk, and the Poincaré half-plane -- provide a context for visualizing the theorems of hyperbolic geometry. By giving students examples of universes where Euclid's parallel postulate fails, they give students a chance to experience hyperbolic geometry in a concrete way: to see how it is possible for two lines through a point to be parallel to a third line, to appreciate a world where rectangles do not exist, and to understand how it is possible for the angle sum in a triangle to fall short of 180 degrees. The Teaching Examples on page 8 illustrate several ways in which the tools accomplish this.
Most of the students taking the geometry sequence at the University of Wisconsin Oshkosh have previously completed a course on the nature of proof. For many, however, the geometry course provides the first opportunity to apply their background in a specific subject. The geometry course emphasizes proper justification, proof, and the nature of axiom systems. A benefit of courses in Euclidean and hyperbolic geometry is that students can clearly see the role of axioms, for the only difference between the two geometries is the parallel postulate. Students learn to be careful about what statements are theorems in Euclidean geometry, which are theorems in hyperbolic geometry, and which are theorems in both. Constructions in the models aid in making these distinctions in two ways. For example, consider the statement "Two lines perpendicular to a third line are parallel to each other." After exploring that statement in the hyperbolic models, a student should get a sense that it is a theorem in hyperbolic geometry as well as Euclidean geometry. The student then knows that proving the statement will not require a parallel postulate. This is indeed a powerful connection for a student to make. Second, a compelling aspect of straightedge and compass constructions is the clear necessity of justification. When a student finishes a construction, only rarely does an instructor need to ask, "How do you know you are correct?" Students naturally ask that question themselves.
By examining hyperbolic geometry we obtain a deeper understanding of Euclidean geometry. The study allows for a contrast; we are able to see what makes Euclidean geometry "Euclidean" by negating a single axiom. Working within the hyperbolic models provides us with another quite different way of enriching our understanding of the Euclidean world. Though each of the models is "hyperbolic", the underlying space for each is the Euclidean plane. For example, the Klein model consists of a fixed circle and its interior, and "lines" in the model are merely chords of the circle. It is a purely Euclidean object. When viewed in this manner, the models can be used as a means of better understanding Euclidean geometry. One useful construction in the Klein model, for example, is the pole of a hyperbolic line: it is the intersection of tangents drawn to the Klein disk at the endpoints of the chord defining the line. Constructing the pole of a Klein line thus involves standard Euclidean straightedge and compass constructions (specifically, raising a perpendicular to a line from a point on the line). In this way, the models offer an opportunity to understand Euclidean geometry through the window of hyperbolic geometry. This argument is fundamental to the nature of the geometries, for the relative consistency of hyperbolic geometry is demonstrated by the existence of models of hyperbolic geometry in Euclidean geometry.
It should be noted that the fourth goal is an implicit one. The course is content-driven, and discussion of teaching methodology is not an explicit part of that content. However, the NCTM's Professional Standards for Teaching tells us, "Learning is an active, dynamic, and continuous process that is both an individual and a social experience." (see Professional Development Standard 3.) We would like our future teachers to support such a learning environment, and so providing them with a model of such a classroom is vital. The Teaching Examples on page 8 offer possible ways in which the tools can be used to stimulate an active learning environment.
As noted in the Background section (Page 5), others have produced Geometer's Sketchpad construction tools for the Poincaré disk and (in part) for the Poincaré half-plane models. Completing the tools for the half-plane and contributing tools for the Beltrami-Klein disk rounds out a package that allows students to analyze hyperbolic geometry in a concrete way from several different perspectives. As the NCTM notes in the Principles and Standards for School Mathematics , "It is important for teachers to highlight ways in which different representations of the same objects can convey different information and to emphasize the importance of selecting representations suited to the particular mathematical tasks at hand." (p. 362) The different models do indeed offer different representations of hyperbolic geometry. The Poincaré models are conformal, and their faithful representations of angle measure make them attractive for this reason. On the other hand, the hyperbolic axiom is most immediate to visualize in the Klein disk, and constructing the common perpendicular between two divergently parallel lines in the Klein model is an accessible problem. The three models together provide a powerful means of considering hyperbolic geometry from different perspectives.
The Hyperbolic Toolbox - The Role of Technology
"Technology is essential in teaching and learning mathematics; it influences the mathematics that is taught and enhances students' learning."
- The Technology Principle, the Principles and Standards for School Mathematics (p. 24)
Technology in the form of a dynamic geometry package such as Geometer's Sketchpad offers a powerful means of studying geometry. As the value of this technology has become recognized, instructors have integrated it into their geometry courses (see, for example, the text by Baragar).
Dynamic geometry software offers access to hyperbolic geometry in at least three fundamental ways. First, Geometer's Sketchpad allows the user to perform basic constructions in the hyperbolic models. Indeed, though not conceptually difficult, many of these constructions are quite challenging from a practical standpoint. Consider, for example, the problem of constructing a hyperbolic line in the Poincaré disk model. That is, given two points A and B interior to the disk, construct with straightedge and compass, the arc of a circle orthogonal to the boundary of the disk that passes through A and B. Theoretically, this is not a particularly difficult construction. If the center of the Poincaré disk is labeled O, then the steps are as follows:
|
|
 |
| Constructing a Poincare line by hand using a straightedge and compass offers a challenge in careful record-keeping. (Click for an enlarged view). |
- Construct ray OA.
- Construct the line through A perpendicular to ray OA. Label the points where this line intersects the boundary of the disk as C and D.
- Construct the lines that are tangent to the boundary of the disk at C and D. Assuming A and B are not on a diameter of the circle, let A' be the point of intersection of these tangents.
- Construct the Euclidean circle through A, B, and A'. The arc of this circle
- is interior to the disk is the desired Poincaré line.
This construction is not conceptually difficult. However, it requires quite a competent student to carry out the steps by hand using a straightedge, compass, and pencil without getting lost in the details of the construction. The capability of the Geometer's Sketchpad software to hide and show parts of a construction on demand helps to eliminate this difficulty.
Second, Geometer's Sketchpad allows users to use basic constructions to build more complex structures. Though understanding how to construct a line in the Poincaré disk is a worthwhile and important skill, one does not want to go through each of the above steps when a hyperbolic line is called for. If one wants to discuss dropping a perpendicular from a point to a line, for example, one does not want to spend too much time on the construction of the given line! As with other technologies, Sketchpad extends the range of problems accessible to students.
Third, through its dynamic nature, Geometer's Sketchpad presents an opportunity for students to explore, experiment, and make conjectures. With its "click-and-drag" capabilities, students are able to change a defining object in a sketch and watch the resulting effect on the rest of the sketch. For example, a typical activity in the Poincaré models is to construct a triangle and observe that its angle sum is less than 180 degrees. However, with dynamic geometry software, one can change the defining vertices of the triangle and observe how the angle sum depends on the triangle, specifically that the larger the triangle, the smaller its angle sum. This investigation can provide a context for an introduction to Gauss's theorem on the proportionality of a hyperbolic triangle's area to its defect. See the Teaching Examples section (Page 8) for more examples.
The Hyperbolic Toolbox - Background: Credit where Credit is Due
Using dynamic geometry software such as Geometer's Sketchpad to investigate non-Euclidean geometry is by no means a new idea. This section provides a brief description of, and pointers to the work of others in this area.
Mike Alexander (with modifications by Bill Finzer) wrote Geometer's Sketchpad scripts to perform ten typical constructions in the Poincaré disk model:
- Construct a non-Euclidean line, given two points on the line.
- Construct a non-Euclidean line segment, given the endpoints of the segment.
- Measure the length of a non-Euclidean line segment.
- Calculate the measure of an angle.
- Construct the bisector of a given angle.
- Construct a perpendicular to a given line through a given point on the line.
- Construct a perpendicular to a given line through a given point not on the line.
- Construct the perpendicular bisector of a non-Euclidean line segment.
- Construct a circle, given its center and a point on the circle.
- Construct a circle, given its center and two points determining the radius of the circle.
These tools have been available for some time: Alexander and Finzer presented them in a MAA session on Geometer's Sketchpad at the AMS-MAA meetings in Orlando in 1996. Their Poincaré disk scripts may be currently found at
http://mathforum.org/sketchpad/maa96/alexander/index.html.
A smaller subset of these construction tools is now included as part of the standard package of sample files in the current version (3.0) of Geometer's Sketchpad.
The ten constructions listed above provide a useful package of tools for the Poincaré disk. As such, they will somewhat arbitrarily be referred to as the "standard constructions". It is the purpose of this document to present the corresponding tools for the standard constructions in the other two well-known models of hyperbolic geometry, the Beltrami-Klein disk and Poincaré half-plane models. Each of these constructions use the Euclidean tools of Geometer's Sketchpad, which are, in essence, computer versions of the straightedge and compass. (It should be noted, of course, that items #3 and #4 above technically are not constructions, since they require the notion of measurement.)
Although Alexander and Finzer's scripts form the standard toolbox for the Poincaré disk and provided the inspiration for this project, others have also developed non-Euclidean Sketchpad construction tools. Dan Bennett has created scripts for the first four constructions (lines, segments, length and angle measure) for the Poincaré half-plane model, as an accompaniment to a text by Sibley. I do not duplicate Bennett's constructions, and encourage interested users to obtain Bennett's scripts, which may be found at
Peil has also written several scripts for the half-plane model, which may be found at
http://web.mnstate.edu/peil/projects/geo.html.
Although several of this author's constructions given in the next section do appear to duplicate Peil's work, there are distinct differences. For example, the midpoint and circle constructions described here use only straightedge and compass constructions, while Peil's scripts involve coordinate geometry as well.
The next section describes how to obtain, install, and use the hyperbolic scripts, with the goal of establishing a toolbox of the ten "standard" constructions for each of the three models. In addition, while creating the constructions the models, it proved useful in some cases to develop additional "intermediate" tools. For example, constructing the perpendicular bisector of a given line segment becomes much simpler once we have algorithms for constructing midpoints and raising perpendiculars. These additional constructions are included as well. To the best of our knowledge, the Klein scripts are original. That is, though others have certainly demonstrated the same constructions, they are an original compilation in the form of Geometer's Sketchpad scripts. The same may be said for constructions 5--10 in the Poincaré half-plane model.
Though the main purpose of this article is to discuss constructions in hyperbolic geometry, tools for constructions in elliptic geometry have been developed as well. Brad Findell presented tools for many standard constructions in a model of elliptic geometry at the 1996 AMS-MAA meetings. These tools are currently available at
The Hyperbolic Toolbox - What's in the Toolbox?
In this section, we give an explicit listing of the hyperbolic construction tools that have been developed in Geometer's Sketchpad for the three most common models of hyperbolic geometry. The goal of this project was to complete a package of tools for automating hyperbolic constructions in each of three models of the hyperbolic plane: the Poincaré disk, the Poincaré half-plane, and the Beltrami-Klein disk. At a minimum, the tools for each model allow one to do any of the following:
- Construct a non-Euclidean line, given two points on the line.
- Construct a non-Euclidean line segment, given the endpoints of the segment.
- Measure the length of a non-Euclidean line segment.
- Calculate the measure of an angle.
- Construct the bisector of a given angle.
- Construct a perpendicular to a given line through a given point on the line.
- Construct a perpendicular to a given line through a given point not on the line.
- Construct the perpendicular bisector of a non-Euclidean line segment.
- Construct a circle, given its center and a point on the circle.
- Construct a circle, given its center and two points determining the radius of the circle.
As noted in the Background section (Page 5), Alexander and Finzer have written the scripts for the Poincaré disk, while Bennett and Peil have developed some of the Poincaré half-plane tools. This author has completed the scripts for the half-plane and produced the corresponding tools for the Klein model. For the interested reader, a mathematical description of the steps required for each of the Klein and Poincaré half-plane model constructions is given in the file toolbox.pdf This file is in PDF format and requires a reader such as Adobe Acrobat, which can be found here. The next page gives more detailed information on obtaining and installing the tools.
Contents of this Page
| Beltrami-Klein disk | model tools. |
| Poincaré half-plane | model tools. |
| Poincaré disk | model tools. |
Beltrami-Klein Model Tools
klein.zip |
All the Klein model scripts in one ZIPPED package |
| klnstrt.gsp | Klein model template Geometer's Sketchpad file. |
| kline.gss | Script to construct a Klein line. |
| ksegmnt.gss | Script to construct a Klein segment. |
| klength.gss | Script to measure the Klein length of a line segment. |
| kangmea.gss | Script to measure an angle in the Klein model. |
| kangbis.gss | Script to bisect an angle in the Klein model. |
| kprpon.gss | Script to construct the Klein perpendicular through a given point on a given Klein line. |
| kprpoff.gss | Script to construct the Klein perpendicular through a given point not on a given Klein line. |
| kprpbis.gss | Script to construct the perpendicular bisector of a Klein segment. |
| kcntrpt.gss | Script to construct a Klein circle given its center and a point on the circle. |
| kcntrrd.gss | Script to construct a Klein circle given its center and two points that determine the radius. |
Creating scripts for the ten "standard" hyperbolic constructions in the Klein disk necessitated the development of several other tools that are particularly useful in this model. For example, constructing the perpendicular bisector of a line segment in the model involves finding the "pole" of a Klein line, so the tool kpole.gss was developed for that purpose. In addition, one particular challenge posed by the Beltrami-Klein model is that unlike the Poincaré models, Klein circles are not Euclidean circles - they are ellipses. As such, in Geometer's Sketchpad, they must be drawn as loci. This creates a practical problem: Sketchpad does not know how to intersect loci. Below, then are some additional tools that allow one to find the intersection of Klein circles with other Klein circles, Klein lines, and Klein segments. All these tools are available in the complete file klein.zip. If you don't have access to an unzipping utility, you could download one from either Pkware or WinZip.
| kpole.gss | Script to construct the pole of a Klein line. |
| kmidpt.gss | Script to construct the midpoint of a Klein segment. |
| kreflpt.gss | Script to construct the reflection of a given point about a Klein line. |
| kintcirc.gss | Script to find the intersection point(s) of two Klein circles. |
| kintlncr.gss | Script to find the intersection point(s) of a Klein circle with a Klein line. |
| kintsgcr.gss | Script to find the intersection point(s) of a Klein circle with a Klein line segment. |
| kd_to_pd.gss | Script to map a point in the Klein disk isomorphically to its corresponding point in the Poincaré disk. |
Poincaré Disk Model Tools
- Mike Alexander (with modifications by Bill Finzer) has created scripts for the ten "standard" constructions for the Poincaré disk model. They provided inspiration for my scripts in the Klein disk and Poincaré half-plane model and can be found here.
- For the Beltrami-Klein model, this author wrote a tool (kd_to_pd.gss) that maps points in the Klein disk isomorphically to their corresponding points in the Poincaré disk. The natural isomorphism is described in Greenberg, p. 236. This author has written a corresponding tool that inverts the process (pd_to_kd.gss), mapping points in the Poincaré disk isomorphically to their corresponding points in the Klein disk. This tool can be found in the file pd_to_kd.zip. If you don't have access to an unzipping utility, you could download one from either Pkware or WinZip.
Poincaré Half-Plane Model Tools
- Dan Bennett has created scripts for the first four constructions listed at the top of this page (constructing lines and segments, and measuring length and angles) in the Poincaré half-plane model. His tools can be found here.
- Tim Peil has also written several scripts for the Poincaré half-plane. His tools can be found here.
- The tools I have written for the Poincaré half-plane complete the remaining constructions for the "standard" ten constructions given at the top of this page. Though some of my tools appear to reproduce the work of others, the constructions do not rely on coordinate (analytic) geometry. See the descriptive file toolbox.pdf for more information.
poinhalf.zip |
All my Poincaré half-plane model scripts in one ZIPPED package |
The zip file contains all of the Poincaré half-plane model scripts listed below. If you don't have access to an unzipping utility, you could download one from either Pkware or WinZip.
| poinhalf.gsp | Poincaré half-plane model template Geometer's Sketchpad file. |
| phlength.gss | Script to measure the Poincaré half-plane length of a line segment. |
| phangbis.gss | Script to bisect an angle in the Poincaré half-plane model. |
| phprpon.gss | Script to construct the perpendicular through a given point on a given line in the Poincaré half-plane model. |
| phprpoff.gss | Script to construct the perpendicular through a given point not on a given line in the Poincaré half-plane model. |
| phprpbis.gss | Script to construct the perpendicular bisector of a Poincaré half-plane segment. |
| phcntrpt.gss | Script to construct a Poincaré half-plane circle given its center and a point on the circle. |
| phcntrrd.gss | Script to construct a Poincaré half-plane circle given its center and two points that determine the radius. |
As in the Klein model above, completing the scripts for the ten "standard" hyperbolic constructions in the Poincaré half-plane necessitated the development of other construction tools in this model. For example, the tool phprpbis.gss that finds the perpendicular bisector of a "line segment" in the half-plane first finds the midpoint of that segment. The tool phmidpt.gss was developed for that purpose. This tool, as well as the script "phreflpt.gss," is available in the complete file poinhalf.zip.
| phmidpt.gss | Script to construct the midpoint of a line segment in the Poincaré half-plane model. |
| phreflpt.gss | Script to construct the reflection of a given point about a line in the Poincaré half-plane model. |
The Hyperbolic Toolbox - Filling Your Toolbox
In this section, we give detailed information on how to obtain and install the tools. This process essentially consists of the following steps:
- Make sure to have a working copy of Geometer's Sketchpad.
- Download the desired tools into the proper directory.
- Unzip any zipped files in the appropriate directory.
- Open the appropriate Sketchpad template file.
- Select and run the scripts of choice to perform the desired non-Euclidean constructions.
-
Make sure to have a working copy of Geometer's Sketchpad. The software can be purchased from Key Curriculum Press. You can download a free demonstration version of Geometer's Sketchpad from the Key Press site. The demo version differs from the full version only in that you cannot save, print, or export your work. It otherwise allows full use of Sketchpad capabilities, including its script tools in particular.
-
Download the desired tools into the proper directory. It is recommended that you create three separate directories where you can store the script tools corresponding to the three different models. For reference, we shall call these directories "poincare," "poinhalf," and "klein."
- Poincaré Disk Tools: As noted in Background (Page 5), Alexander and Finzer have written the scripts for the ten standard constructions in the Poincaré disk model. Their tools are available here, and can be downloaded into the "poincare" directory. This author's tool (pd_to_kd.gss) for mapping points in the Poincaré disk isomorphically to their corresponding points in the Klein disk can be found in the zipped file pd_to_kd.zip.
- Poincaré Half-Plane Tools: Bennett and Peil have developed some of the hyperbolic tools for the half-plane model, and those tools may be downloaded into the "poinhalf" directory. This author has developed the remaining construction tools for the half-plane, and these scripts may be downloaded as the package poinhalf.zip. See What's in the Toolbox? (Page 6) for more information on what is included in the package.
-
Beltrami-Klein Disk Tools: Also available in a package are the construction tools for the Beltrami-Klein model. The package klein.zip can be downloaded into the "klein" directory. See What's in the Toolbox? (Page 6) for more information on what is included in the package.
-
Unzip any zipped files into the appropriate directory. If you downloaded "klein.zip" or "poinhalf.zip," unzip the files in the directory in which you will be storing the tools. There are several shareware and commercial vendors of unzipping utilities (see Pkware or WinZip, for example), and extensive documentation is available.
-
Open the appropriate Sketchpad template file. These templates contain the basic geometric structures associated to each model. For example, the Klein model template "klnstrt.gsp" contains a template for the Klein disk. It consists simply of a circle defined by a center point (labeled "K-Disk center") and a point on the circle (labeled "K-Disk radius"). The labelling is important if you wish to use the scripts in an automated setting (see #5 below). The hyperbolic tools assume those labels as givens for the constructions. If the center and "radius point" are labeled differently, then the scripts will need to be played manually (see #5 below). The template for the Poincaré disk (a circle with center "P-Disk center" and point "P-Disk radius") is found in the file "poinstrt.gsp". The template for the Poincaré half-plane model (consisting of a horizontal line through two points labeled "A" and "B") can be found in the file "poinhalf.gsp."
- Select and run the scripts of choice to perform the desired non-Euclidean constructions. There are two different ways to run a Sketchpad script: manually by "playing" an open script, and automatically by using a script tools directory. We will consider each of these in turn, and include a detailed example for less experienced users of Geometer's Sketchpad. In either case, however, Sketchpad has extensive documentation on using scripts. (Note: The examples and instructions described below were documented using version 3.10 of Geometer's Sketchpad on a Windows 98-based computer. On other platforms or different versions of the software, the general steps should still be the same, but the specific keystrokes may be slightly different.)
-
Running a script manually: Every Geometer's Sketchpad script accepts certain geometric objects as inputs ("Givens") and returns a requested geometric object as an output. Running a script manually amounts to opening the appropriate script, informing Sketchpad of the "givens" for the script, then "playing" the script. For example, suppose one wants to draw a non-Euclidean circle having center O and radius OP in the Klein model. First open the appropriate template file (klnstrt.gsp in this case) as detailed in #4 above. Plot (and label) two points O and P, which will be the respective center and point on the circle. The script that performs the circle construction is titled klncntrpt.gss, and this file needs to be opened as well. This is done by selecting "Open" from the "File" menu option, then selecting "klncntrpt.gss" from the appropriately named directory, "klein" in this case (see #2 above). When these steps are completed, the Sketchpad desktop should look something like this:
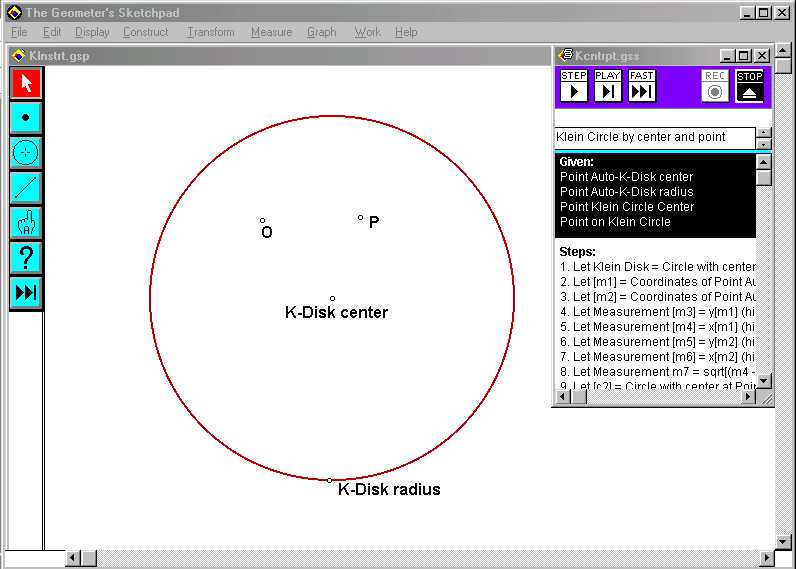 |
| (The above figure comes from a Windows 98 version of Geometer's Sketchpad; the desktop may appear slightly different on different platforms.) In this picture, the script file appears on the upper right-hand of the desktop. Click on the image for an enlarged view. |
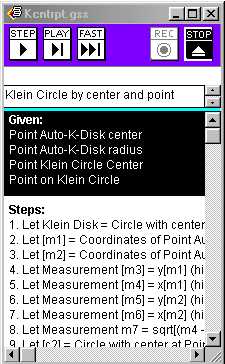 |
| A closeup of an open script file. |
To construct the desired non-Euclidean circle, the script requires four pieces of information: the two points which define the circle and the two points that define the Klein disk. As a result, the script kcntrpt.gss for a Klein circle accepts as "Givens" four different objects: the point defining the center of the Klein disk (called "K-Disk center"), and a point on the boundary of the disk (abusively called "K-Disk radius"), together with the center O of the circle and a point P on the circle. To construct the circle, highlight the givens in the appropriate order by holding down the "Shift" key while selecting the givens in your sketch in the correct order: click on the point "K-Disk center," then click on the point "K-Disk radius," then click on your center point O, and finally click on the point P which will lie on the desired circle. (Remember to hold down the "Shift" key while making these selections.) At this point, all of your givens should be highlighted. If the script becomes hidden on your desktop because of these actions, you can bring it on top again by selecting it under the "Work" menu option. Now play the script by clicking on the "Play" button on the tool:
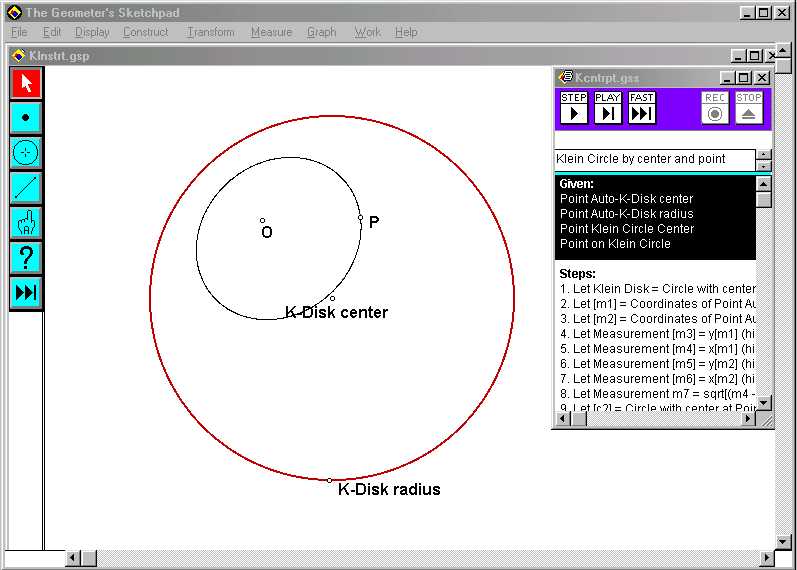
Sketchpad should construct the desired circle, and you should be able to watch the program performing the steps in the construction. Click on the "Fast" button to have the construction finished more rapidly. The figure that should result is given in the picture below (click on the figure to see an enlarged view):
-
Running scripts automatically using a script tool directory. Running scripts manually can be cumbersome, particularly if one needs to use many different tools in a sketch: the desktop ends up being cluttered with open scripts. Automatic scripting provides a faster and cleaner way of using scripts. The idea is to create a new tool on the left-hand toolbar on the desktop by telling Sketchpad where one's scripts are stored. Then when one wants to use a particular tool, it can simply be selected from the toolbar and used as one would use the usual line-drawing or circle-drawing tools. For example, suppose as above, one wants to draw a non-Euclidean circle having center O and radius OP in the Klein model. To do this, one must first set the Geometer's Sketchpad "script tool" directory to "klein" (or to whichever directory the Klein disk tools have been stored). One way to set this directory is by editing user "Preferences." Select "Preferences" under the "Display" menu, then click "More," since setting the script directory is on the second page of options. Choose the "Set" option under the "Script Tools Directory:" and set the directory to the directory in which the appropriate tools are stored (directory "klein" in this example). Geometer's Sketchpad has additional documentation on this and on other ways to set your script tools directory. Once you have chosen a valid directory, a "script tools" icon,
will appear on the left side of your Sketchpad desktop, just below the Object Information ("?") tool.
Next, one needs to open the appropriate template file (klnstrt.gsp in this example), and to make sure that the disk center and "radius point" are labeled properly. In our particular example, the center must be labeled "K-Disk center" and the point on the boundary of the disk must be labeled "K-Disk radius." One can see from script definition for kcntrpt.gss (see the picture above) that the "Givens:" include "Auto-K-Disk center" and Auto-K-Disk radius." When using automatic scripting, Sketchpad looks for these "Auto" points by name, so if the Klein disk is not labeled in this way, the automatic scripting will fail.
If the script directory has been set up properly and a properly labeled template file has been opened, then automatic scripting is straightforward. One can select the appropriate hyperbolic tool by clicking on the script tool button, then scrolling down to the desired tool (in our example, this is the tool entitled "Klein Circle by center and point":
 |
| Click on the image for an enlarged view. |
Once the script tool has been selected, the mouse pointer should appear with a small circle at its tip:
Now if one selects the other desired givens for the script by clicking in the sketch, Geometer's Sketchpad should perform the desired construction automatically. In our Klein-circle example, after selecting the proper script tool, if one clicks on two points in the interior of the Klein disk (corresponding to the two remaining givens, center O and point P on the circle), Geometer's Sketchpad will construct the desired hyperbolic circle. In fact, after clicking on the center point O, the circle will be generated dynamically; Sketchpad will construct the Klein-circle centered at O and passing through the current location of the pointer, and will continue to do so until the second click:
 |
| Click on the image for an enlarged view. |
The Hyperbolic Toolbox - Teaching Examples
There are several ways in which the hyperbolic construction scripts can be used in classroom applications. It should be emphasized, however, that the scripts are tools and not ends in themselves. They can be adapted by an instructor to produce applications suitable for classroom demonstrations. Perhaps more importantly, though, they can be used as building blocks for students to develop their own constructions and gain a deeper understanding of hyperbolic geometry. The examples below provide a sample of how the scripts have been used in teaching geometry, but the list is not exhaustive by any means. Creative instructors will be able to find many other uses.
- Have students develop some of the tools themselves. The difficulty of writing the Sketchpad scripts for the basic "hyperbolic straightedge and compass" constructions varies greatly. In the Klein model, for example, constructing lines and segments are trivial, calculating lengths, dropping and raising perpendiculars is relatively straightforward, while calculating angle measure, constructing midpoints, angle bisectors, and circles is quite challenging.
Interestingly, the corresponding constructions in the other models do not necessarily have corresponding difficulty levels. For example, writing a tool that constructs a hyperbolic line in the Klein model is merely a matter of drawing a chord passing through two points interior to a circle. Constructing a half-circle passing through two points in the Poincaré half-plane is slightly more challenging, though students who are able to circumscribe a circle about a triangle should be able to complete this task. Constructing a hyperbolic line in the Poincaré disk requires several steps, including the ability to find "inverse points" (see Greenberg p.243-247). On the other hand, calculating angle measure in the Poincaré models is relatively straightforward since these models are conformal, while in the Klein model, this action requires the use of hyperbolic trigonometry.
In my classroom, I have had students develop the tools for constructing lines and segments in the three models as an introduction to the models and to writing scripts in Geometer's Sketchpad after reading the appropriate section of Greenberg for the Poincaré disk construction. In addition, I have the students discover on their own and without a computer how to "raise perpendiculars" in the Poincaré models. For more advanced classes, the more challenging constructions could be assigned as individual or group projects.
-
Use the scripts as a toolbox for more extensive hyperbolic constructions. The scripts can serve as building blocks for Geometer's Sketchpad activities that lead to a more complete conceptualization of hyperbolic geometry. The power of the tools becomes most apparent here: students are able to investigate the subject interactively as they develop their own constructions. Moreover, constructions require justification. After completing a construction, the natural question to ask is, "Is it correct?" Here are some samples that illustrate these principles:
-
Use the scripts to either motivate or help students visualize major theorems in hyperbolic geometry. Many of the theorems of hyperbolic geometry are counterintuitive for students who have until now considered only Euclid's geometry. For these students, the hyperbolic models can be a welcome relief. Abstract theorems can give way to illuminating examples, illustrating many of the properties of non-Euclidean geometry.
Although not truly applications in themselves, the hyperbolic tools can be used (by either the instructor or students) to develop applets illustrating hyperbolic geometry.
The Hyperbolic Toolbox - References
Baragar, A. (2001). A Survey of Classical and Modern Geometries with Computer Activities, Upper Saddle River, NJ: Prentice-Hall.
Greenberg, M. J. (1993). Euclidean and Non-Euclidean Geometries: Development and History , 3rd Edition, New York: W. H. Freeman and Co.
Lynch, J. (1997). The Proof Public Broadcasting Service (PBS), Boston: WGBH.
National Council of Teachers of Mathematics (1991). Professional Standards for Teaching Mathematics, Reston, VA: National Council of Teachers of Mathematics.
National Council of Teachers of Mathematics (2000). Principles and Standards for School Mathematics, Reston, VA: National Council of Teachers of Mathematics.
Sibley, T. Q. (1998). The Geometric Viewpoint: A Survey of Geometries, Reading, MA: Addison-Wesley.