- About MAA
- Membership
- MAA Publications
- Periodicals
- Blogs
- MAA Book Series
- MAA Press (an imprint of the AMS)
- MAA Notes
- MAA Reviews
- Mathematical Communication
- Information for Libraries
- Author Resources
- Advertise with MAA
- Meetings
- Competitions
- Programs
- Communities
- MAA Sections
- SIGMAA
- MAA Connect
- Students
- MAA Awards
- Awards Booklets
- Writing Awards
- Teaching Awards
- Service Awards
- Research Awards
- Lecture Awards
- Putnam Competition Individual and Team Winners
- D. E. Shaw Group AMC 8 Awards & Certificates
- Maryam Mirzakhani AMC 10 A Awards & Certificates
- Two Sigma AMC 10 B Awards & Certificates
- Jane Street AMC 12 A Awards & Certificates
- Akamai AMC 12 B Awards & Certificates
- High School Teachers
- News
You are here
Geometric Photo Manipulation - Projection Formulas: Perspective
To clarify the projection methods, let's look in more detail at the example shown in Figure 3 (preceding page), in which the 400 by 400 pixel image of a storefront is pasted onto three faces of a cube in ![]() . The cube is our three-dimensional object -- its front face is the plane
. The cube is our three-dimensional object -- its front face is the plane ![]() , and the other faces are the planes
, and the other faces are the planes ![]() and
and ![]() . To project this object -- using either the perspective or the orthographic method -- we apply the color values of the
. To project this object -- using either the perspective or the orthographic method -- we apply the color values of the ![]() pixel (counting i rows down from the top and j columns left to right in the input image) to each of three points belonging to the three visible faces of the cube. That is, letting
pixel (counting i rows down from the top and j columns left to right in the input image) to each of three points belonging to the three visible faces of the cube. That is, letting ![]() be
be ![]() for the front face,
for the front face, ![]() for the right face, and
for the right face, and ![]() for the top face, we apply the color of the
for the top face, we apply the color of the ![]() pixel to a certain computed point of the output image.
pixel to a certain computed point of the output image.
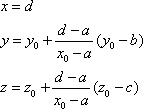
For the perspective projection in Figure 3(a), the viewer's eye is at the point ![]() , and the viewing plane is
, and the viewing plane is ![]() . In this case, we find that the computed point
. In this case, we find that the computed point ![]() where the line through
where the line through ![]() and
and ![]() meets the viewing plane is
meets the viewing plane is
In the final step we need to identify these projected points with the pixels of an output image. One way is to begin by (roughly) estimating bounds on the calculated y and z coordinates. Let's say that all the points ![]() calculated from the scene satisfy
calculated from the scene satisfy ![]() and
and ![]() . Then we can use
. Then we can use ![]() to yield appropriate row and column indices for the output image. Note that the indices are chosen so that the largest possible z value in the scene leads to the smallest row number (at the top of the image) and the smallest y value of the scene leads to the smallest column number (at the left edge of the image). The function round is applied to round to the nearest integer so that the indices of the output array are positive integers. The size of the output array can be taken to be
to yield appropriate row and column indices for the output image. Note that the indices are chosen so that the largest possible z value in the scene leads to the smallest row number (at the top of the image) and the smallest y value of the scene leads to the smallest column number (at the left edge of the image). The function round is applied to round to the nearest integer so that the indices of the output array are positive integers. The size of the output array can be taken to be ![]() rows and
rows and ![]() columns.
columns.
This procedure has been implemented in the MATLAB program perspective.m.
Tom Farmer, "Geometric Photo Manipulation - Projection Formulas: Perspective," Convergence (October 2005)